How to Take Landscape Photos - Landscape Photography Technique
A landscape photography technique tutorial
This landscape photography technique blog is part of my HOW TO TAKE LANDSCAPE PHOTOS - TEN STEPS TO CREATING SUCCESSFUL LANDSCAPE IMAGES tutorial series.
For a list of landscape photography equipment that I use, please check out My Gear List.
When I am planning landscape photography trips and taking landscape photos, the two aspects that I consider the most are light and composition. There is a trip planning process that I go through that investigates potential subjects to understand when will be the best time to visit a location. If you haven’t already done so, I encourage you to check out my tutorials on light, composition and trip planning. These are important to understand because they will help you with capturing the images you want. Your understanding of these subjects is as equally important as your technical camera skills.
This blog tutorial aims to help you further develop your technical camera equipment skills to a level that will help you create the images you aspire to create. This blog has been written in a way that will benefit a novice the most. However, regardless of your current skill level, I am sure there will be at least one thing or more that every photographer will take away from reading this blog.

If you are reading this tutorial and you are in the process of buying new camera equipment, please read my separate tutorial on how to choose the best photography equipment for your needs.
Shooting Modes
Most cameras have shooting mode options in their settings. They are generally the same regardless of the manufacturer. The shooting modes drive the camera settings that affect exposure (shutter speed, aperture and ISO), and they are:
-
Manual - Gives the photographer all the control over the exposure settings. The photographer must adjust shutter speed, aperture and ISO to capture a correct exposure based on the applied meter settings. The live preview mode on the camera LCD screen or the viewfinder on a mirrorless camera will help you. The overexposure and underexposure warnings switched on (if available) will help. Or with the histogram preview switched on (if available). Shoot with bracketing switched on if your camera does not have exposure warnings or a histogram.
-
Aperture Priority - Gives the photographer all the control over the aperture setting. The camera will select the ISO and shutter speed settings based on the applied aperture and light meter settings. On most camera's it is possible to use aperture priority with the photographer selecting the desired ISO setting. The camera will decide the shutter speed. Some cameras will allow the photographer to set an ISO range that the camera can choose. Many landscape photographers use aperture priority because it gives them all the control over depth of field and sharpness but will allow the camera to select shutter speed, and the photographer can (if available) select ISO.
-
Shutter Priority - Gives the photographer all the control over the shutter speed setting. The camera will select the ISO and aperture settings based on the applied shutter time and light meter settings. This camera setting is ideal when the desired shutter speed is known. For example, if fast-moving subjects must be sharp (shutter speed >1/500th) or during long exposures when the shutter speed is known.
-
Program (Automatic) - Gives the camera all the control of the exposure settings. It will decide the exposure settings based on the selected light meter settings. Most modern-day digital cameras are intelligent and can determine the type of photography (landscape, portrait, etc.). The camera will use this information to help choose the settings. This setting is ideal for beginner photographers and more experienced photographers when they do not have the time to set the settings. Exposure compensation can be applied when in program mode.
-
Custom - Gives the photographer a way to pre-set custom settings for frequent and familiar situations that require specific camera settings. Custom modes also allow you to set other camera settings, for example, focus modes, colour profiles, white balance, bracketing, etc. Landscape photographers can use custom modes to quickly set their camera up to suit the type of landscape photography, then make finer adjustments if needed. For example, there could be custom settings for seascapes, long exposures, with a tripod, without a tripod, etc.
For landscape photography, I recommend using manual mode. With the histogram and exposure, warning signs switched on (if available) and bracketing switched on.
EXPOSURE SETTINGS
By reading my Understanding Light tutorial, you will know that correct exposure is when the histogram in your camera displays the highest amount of information in the middle or slightly to the right. If your camera is digital, there is a good chance that it will have the ability to display a histogram, either in live view mode before you have taken the shot or in the preview mode after you have taken your photograph.

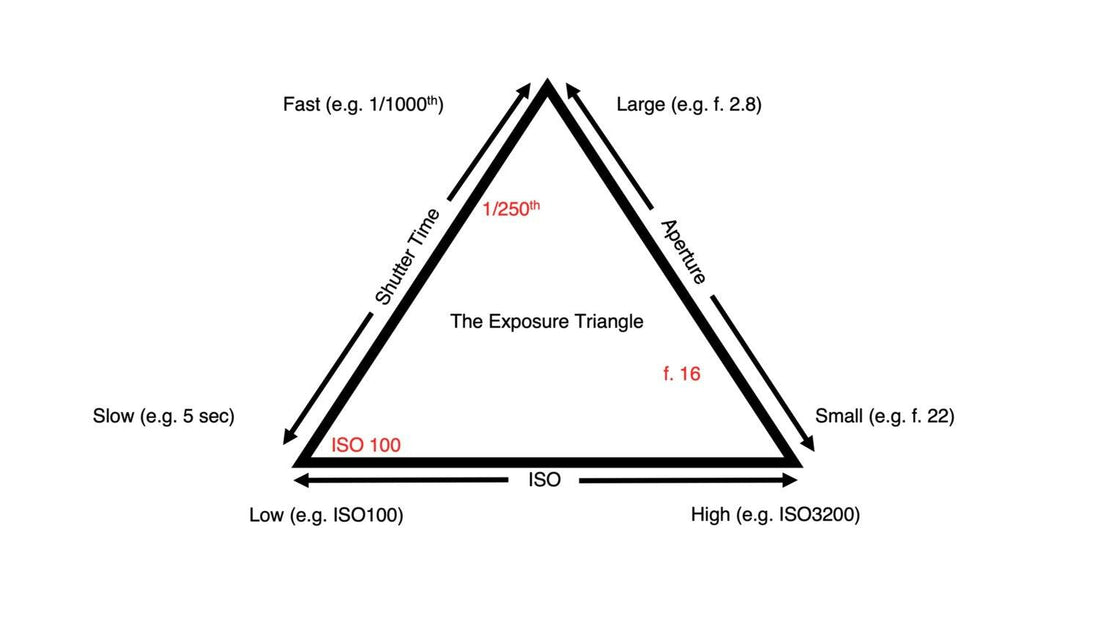
Figure 1 - Showing the exposure triangle with the typical shutter, ISO and aperture settings for a sunny day (shown in red).
For correct exposure, three camera settings must be correctly set. These camera settings are ISO, shutter speed and aperture. Depending on the camera, they are adjustable in one-stop, one-half stop or one third stop increments. Shutter speed, aperture and ISO are referred to as the exposure triangle. As shown in Figure 1 above, shutter speed, aperture and ISO must be set relative to each other for a correct exposure. Figure 1 shows the typical exposure settings for a sunny day. If one of these settings is changed, one of the other settings must be changed as well. For example, if the aperture is changed to f.11 (-1 stop) the shutter speed or ISO must be changed. In this example, it is unlikely the ISO will be reduced because it is already at ISO 100, which is the lowest ISO setting for most cameras. The shutter speed must be changed to 1/500th of a second (+1 stop).
It is important to note that these camera settings have aesthetic uses that will impact the final image. I will cover these as we go through this tutorial.
ISO Settings
Every camera has an ISO setting, whether it be automatic, manual or both. When you set the ISO or the camera is deciding for you, keep in mind that it has two effects on your image. The first effect plays a role in making sure your image is exposed correctly. The second effect is considered an aesthetic and related to visible digital noise in your photographs. Digital noise is similar to visible grain in traditional rolls of film and impacts the image visually. By changing the ISO setting in your digital camera, you are adjusting the sensitivity of its sensor to light. ISO settings generally run from 100 to 102,400, and some cameras can expand their range from 50 to 409,600. Lower ISO numbers require more light to make an image than higher ISO numbers. ISO is part of the exposure triangle and must be selected relative to shutter speed and aperture as shown in Figure 1 above.

Figure 2 - Showing a digital noise comparison between ISO 100 and ISO 64000.
The application of the ISO settings should be considered from an aesthetic point of view as well. When you adjust your ISO setting, the amount of visible digital noise in your image will change. There is less digital noise at lower ISO numbers compared to higher numbers. Figure 2 above shows a comparison between ISO 100 and ISO 64000. You will see there is a grain effect that has been added to the image because of the higher ISO number. Clean and sharp images require an ISO range between 100 and 400. If you want to add a film-like grain effect, you should try an ISO setting above 400. Digital noise is more noticeable in smooth areas like the sky and water and deep shadow areas as shown in Figure 2. It is worth noting that ISO can assist with making sharp images when there are lots of finer details in the image and there is not much light around. Take woodland photography as an example because it requires higher ISO ranges (200 to 800). Most landscape photographers will typically use an ISO between 100 and 400 with a tripod to achieve a smooth appearance in the sky or water. If there is any digital noise in the deep shadow areas, it can be removed during post-processing. Higher ISO numbers can be used in landscape photography and are more suited to images with lots of detail across the image. If needed, noise can be added or reduced during post-processing.
Shutter Speed
Every camera or lens has an inbuilt shutter. It will either be in the camera body, be in the lenses or be a digital shutter. Some digital cameras have both a physical shutter and a digital shutter, and they can be selected to suit your preferences. Digital shutters are silent and can achieve much higher shutter speeds than a physical shutter. The shutter has two functions. The first function is to control the amount of light that will contact the camera's sensor. The second function is considered an aesthetic; it is related to image quality and plays a role in image sharpness or blur.
The shutter is part of the exposure triangle as shown in Figure 1 above. The shutter affects the amount of light making contact with the sensor in your camera and must be selected relative to ISO and aperture as shown in Figure 1. The physical shutter is a device in front of the sensor. It is either in the camera body or the lens, and it opens and closes. The shutter in a single-lens reflex camera (SLR) is always in the closed position. By pressing the shutter-release button, it will open as per the shutter time setting; or, when it is in live view mode, it will be open and will close and operate as required. For mirrorless cameras, the shutter is always in the open position. Mirrorless cameras require a sensor for the viewfinder imagery. When the shutter button has is pressed, it closes and operates as per the shutter time setting to take the image; it then opens again. Some camera systems have the shutter in the lens, they are referred to as a ‘leaf shutter’ and they are always closed until the shutter button is pressed. The sound of leaf shutter is quieter than the shutter in a camera body. The Digital shutter operates with the same principles as a physical shutter. The actual sensor switches on and off as per the shutter time settings. The time setting of the shutter will vary from camera to camera but generally will run between twenty-five seconds to 1/8000th of a second. Most cameras have a bulb setting that allows the shutter to stay open for an infinite amount of time when the shutter release button is being pressed continually, either by hand or with a remote control device. Figure 3 below shows the location of a shutter in a mirrorless or DSLR camera.

Figure 3 - Showing the location of the shutter, aperture and ISO in a digital camera.
The secondary function of the shutter will affect the appearance of your images. You must use the shutter to ensure you capture a sharp photograph. However, you can use it to create a soft and blurry picture. If you require a sharp photograph and you are hand-holding your camera, or your subject is moving, a shutter speed of 1/250th of a second or faster is required. Assuming your lens is focused, the burst of light hitting the camera's sensor will preserve the sharp edges of your subjects. Slower shutter speeds are required to create image blur. This effect helps translate motion or to produce a painterly effect onto your images. Shutter speeds slower than 1/250th of a second will require a tripod. Tripods are not essential for intentional camera movement photography. Slower shutter speed is often referred to as long exposure photography and is a common technique in landscape photography. If you want to smooth out water or the sky, which is often the case for long exposure photography, slow shutter speeds and a tripod are required. Figure 4 below shows the difference between an image with a fast shutter speed and slow shutter speed.

Figure 4 - Showing a comparison between a fast shutter speed and slow shutter speed. The effect is most visible in the water and in the sky. The image with the faster shutter speed is on the left, and the slower speed image is on the right.
Aperture Settings
Every camera lens has an aperture that will either be adjustable by you or is fixed. The camera lens aperture has two primary functions plus two secondary aesthetical effects that impact image quality. The first primary function controls the amount of light making contact with the sensor of your camera. The second primary function is to control the amount of sharpness in your images when the lens is in focus. Aperture can create aesthetic effects in your photographs, like the bokeh effect when the aperture setting is set to its wide-open position (f.2.8) and a star effect with light sources when set to a more closed position (f.16). Also, it can impact Image quality caused by diffraction (> f.11).
All lenses are either fixed to a camera or are interchangeable, and they have an aperture. The aperture is part of the exposure triangle and its selectable range is defined as an f. stop (number). It is either adjustable in one-stop increments, one third stop increments or both. Some lenses have a fixed aperture and their design performs at its optimum in every application. Depending on the type of camera, they are usually between f.4 and f.8. Figure 5 below shows the difference between a small aperture and large aperture. Most lenses have an adjustable aperture and depending on the type they are between f.2.8 to f.22. However, larger f. stop ranges are available in prime lenses. Adjustment of the aperture is made by rotating the aperture selector on the lens or by adjusting the aperture control setting in the camera. Some lenses and cameras can do both.

The aperture works like the iris in our eyes. It can be adjusted to open and close to control the amount of light marking contact with your camera sensor. When the aperture is at its smallest f. stop number (e.g. f.2.8), the diameter of its opening is the largest. At this point, the maximum amount of light is passing through it towards the sensor in your camera. When the aperture is at its highest f. stop number (e.g. f.22), the diameter of its opening is at its smallest. At this point, there is less light passing through your lens. Aperture is part of the exposure triangle and should be set relative to ISO and shutter speed as shown in Figure 1 above.
Aperture has an impact on image sharpness and depth of field in your images. When you are creating landscape photography images and you are making decisions about your aperture setting you are deciding how much sharpness and depth of field there will be. There are three aspects to be considering. These aspects are subjects of interest required to be sharp, the focus point on those subjects and the aperture setting. These three aspects are the contributing factors to the depth of field. Depth of field refers to the amount of sharpness in your image between the nearest and furthest away objects. When there is a large depth of field there is image sharpness at both these points. When there is a shallow depth of field there is only image sharpness at a narrower point between the nearest and further objects.

Figure 6 - Shows the depth of field difference between a small aperture (f.2.8) and a large aperture (f.22).
When I am photographing landscapes, I do not always want everything to be sharp in my images. Sometimes, I prefer to have my main subject of interest be the sharpest, with the rest blurred. This effect is referred to as a shallow depth of field and is great for making a subject stand out from its surroundings. You can create this effect by ensuring your main subject is in focus. You must select an aperture setting that will cover the depth of your subject. For illustrative purposes, Figure 6 above shows an aperture setting for f.2.8 and the camera is focusing on a tree in the middle of the scene. This combination will result in the mountains on the horizon and the flowers in the foreground being soft and unsharp. By using a telephoto lens or close focus techniques the depth of field will be emphasised further.
For most of my landscape photography images, I require everything in the image to be sharp. For this, an aperture setting with a high f. stop number will result in a large depth of field. Putting the type of camera and lens used to one side for a moment because we will touch on this later, for illustrative purposes Figure 6 above shows an aperture setting of f.22 and the camera is focused on the mountains. This will result in image sharpness from the front of your images to infinity. For landscape photography images that require infinite sharpness, this is great. However, using the highest f stop setting on your lens is pushing the capabilities of your lens and the capabilities of light. Every lens has an optimum performance setting for aperture. When you are researching a lens because you are buying it, you can check this out by looking at its MTF charts on the manufacturer website. For most lenses, their optimum performance aperture setting is the middle setting. For a lens that has an aperture setting from f.2.8 to f.22, its optimum aperture setting will likely be f.8. If you are using an f. stop setting on your lens greater than its optimum level, you will start to see a slight reduction in sharpness in your photos, caused by diffraction. Diffraction is a phenomenon that occurs when light rays pass through small openings. The light bends around the edges of the aperture opening that results in a loss of sharpness.

Figure 7 - Shows a how to focus using the hyperfocal focusing method.
For illustrative purposes and assuming there is a 25mm wide-angle lens on a full-frame camera. Figure 7 above shows a comparison between three different f stops, their focus points and sharpness. When the focus point of this camera is set to infinity and the 25mm lens is set to an aperture of f.2.8, the horizon will be sharp. Then, sharpness will start to reduce very quickly towards the location of your camera. If we repeat the same shot with the same focus point and this time with an aperture setting of f.8, there will be an increase in image sharpness between the horizon and the middle foreground. There will be a reduction in image sharpness from the middle ground to the immediate foreground. There are three options to achieve a sharp image from the immediate foreground to the horizon. Option one requires you to use an aperture size of f.22. Option two requires you to set the lens to its optimum aperture setting and use the hyperfocal focusing method. Option three requires you to set the lens to its optimum setting, then take three pictures at different focus points and focus-stack them during post-processing using Photoshop, which is a workable solution. However, f.22 will result in a loss of sharpness of approximately 90% caused by diffraction. Option two utilises the hyperfocal focusing approach, which requires the lens to be set up to its optimum setting (in this example it is f.8) as per Figure 8 below. Then focus on a mid waypoint in the image. This approach will provide a noticeable improvement to image sharpness when compared to option one. The third option is focus stacking and can result in a very sharp image. However, it requires extra time during post-processing.

Figure 8 - Showing the hyperfocal range (depth of field) in feet and meters for f.8 on a medium format 50mm prime lens.
The type of camera and lens you are using will affect the depth of field. Not all cameras and lenses have the same depth of field characteristics. It is important to practice and learn the capabilities of your camera system. Manual focus lenses have a depth of field scale on them and must be used to guide you. Some camera lenses have poorly calculated depth of field scales on them and they should be tested by you. Also, the depth of field on a micro four-thirds camera is different to a medium format camera. Generally, cameras with a larger sensor will have more of a natural shallow depth of field and require higher f. stop numbers to achieve a large depth of field. Smaller sensors are the opposite. Micro four-thirds cameras achieve a larger depth of field with smaller f. stop numbers. However, they require smaller f. stop numbers (e.g. f.1.2) to achieve a very shallow depth of field. The type of lens used affects the depth of field as well. Telephoto lenses are difficult to close focus whilst retaining sharpness on the horizon and with very long telephoto lenses it is impossible. Wide-angle and normal lenses are much more capable of achieving a high depth of field.

Figure 9 - Showing a nice bokeh effect in the upper out of focus part of the image. This image was taken with a 25mm lens at f.8.
The aperture can create a bokeh effect in your images. Bokeh is the name for the small bright areas in your image that appear like soft translucent balls. The shape of these balls is the shape of your aperture. Bokeh will appear in the out of focus areas of your images when your aperture is set to a small f. stop number. This effect is great for macro photography but can also be used in landscape photography. Shallow depth of fields will make your subject stand out and there will be small bright objects behind your main subject like the example shown in Figure 9 above. This image used a 25mm lens at f.2.8 and the out of focus area to the back of the image show some nice bokeh effects.
The aperture can create star effects in your images. To create star effects in your images, the aperture should be set at f.16 or higher and with a strong light source in your scene. For example, the light source can be a rising or setting sun or lights from urban environments. Alternatively, it can be multiple light sources like street lights. As you can see in Figure 10 below, each of the street lights has a star effect. This image was taken with a 25mm lens at f.16 at night with a thirty-second exposure.

Figure 10 - Shows the starburst effect on the strong light sources coming from the street lights. This image was taken using a 25mm lens at f.16.
Image sharpness
When you are creating landscape photographs, the main subject or subjects in your images should be sharp. The whole photo does not have to be sharp. Your camera will produce sharp photo's if it has been set up correctly for the conditions. For landscape photography, the reverent settings that affect image sharpness are shutter speed, aperture, ISO, focus point, focus mode, plus the stability of the camera. It is also important to note that cameras and lenses produce different image qualities. Using the best camera equipment does not mean that your images will naturally be sharp; unless you have set it up to the best of its ability for the shooting conditions.
Image sharpness is a combination of all the relevant settings in your camera set correctly. Most digital cameras in today's market do a great job of this when they shoot with everything in automatic mode. But, it is essential to remember that all the settings will be fighting each other, and the final image will have a compromise of exposure, sharpness and ISO. Most landscape photographers will set their camera up in full manual mode, then set it up to the best of their ability for the conditions they are using it in.

Figure 11 - Using a camera on a tripod with a remote shutter release cable to maximise image sharpness.
As a landscape photographer, you should use a tripod and a remote shutter release device because it will allow them to position their camera in a way that suits their composition. The tripod and a remote shutter will help prevent camera shake as shown in Figure 11 above. Because your camera is stable and the camera button is activated remotely. When you are using a tripod, it improves your chance of capturing a sharp image. It allows the camera to be set at its best ISO setting, which is generally ISO 100. Using a low ISO helps with sharpness because it produces less digital noise. Most landscape photographs use their best settings to get sharp images. They are: use a tripod; manual focus on your main subject of interest; an aperture size of f8 or f11; ISO 100; and, leave the shutter speed in automatic mode (Aperture Priority Mode) and add exposure compensation so that the histogram curve is slight to the right. In this example, if you are shooting in low light situations with moving objects in your scene (water or clouds) they will be slightly blurred. If they are required to be a sharp adjustment to shutter time, ISO or aperture will be required. Use a faster shutter speed with a higher ISO setting or a smaller aperture number.
Shutter release devices will help reduce camera shake because the shutter release button is operated remotely; by either a wireless or wired device. Some camera manufacturers provide a phone app that controls their cameras. Some supply a dedicated handheld device that is wireless or wired to the camera that operates the shutter button. Some cameras will have a screw-in option on the shutter button that takes a screw-in cable release. Many landscape photographers will use these devices to control the shutter release button, which reduces camera shake. Alternatively, if your camera has a shutter release delay timer, you can use this instead. Most cameras will have a setting that delays the shutter release by 10 seconds after pressing the shutter button.

Figure 12 - Image stabilisation should be switch off when your camera is on a tripod (unless, your camera is being moved on the tripod by high wind).
Another image sharpness factor to consider is camera and lens stabilisation. Some cameras and lenses have stabilisation built into them. If your camera has in-body stabilisation it will counterbalance your movements. Stabilisation in a lens operates in the same way. If you do not have a tripod, stabilisation can assist with image sharpness because the camera and lens stabilisation will remove any camera shake. Some camera and lens setups with stabilisation can allow - 5 stops of light. However, if stabilisation is activated, it can reduce image sharpness because it will be operating. The camera sensor and lens glass elements will be moving and reduce image sharpness unless there is a strong wind moving your camera and tripod. You should switch off stabilisation if your camera is on a tripod.
Light Meter Modes
In today's market, digital cameras come with many different light meter modes. They are all based on three functionalities that you should know. Most cameras use a spot meter, a centred weighted meter and an average meter. Depending on the manufacturer, there can be different variants to these three light meter types.
You must understand that a light meter operates using black, grey and white. The light meter will produce an 18% middle grey (or Zone 5 on the Ansel Adams Zone System) result as shown in Figure 13 below. The Ansel Adams Zone System is used to understand the variants of light and dark within the landscape. Zone 0 to 10 is often known as dynamic range.

Figure 13 - Showing the Ansel Adams Zone System that is used with light meters for calculating an exposure, and exposure compensation.
The spot meter function in your camera will take a reading from an area in your image that is selected by you and produce a result based on 18% middle grey. The key to using the spot meter is to know what objects in your image you want to be 18% middle grey. The centre weighted meter function will take a reading from everything in the centre of your image and average it out to 18% middle grey. The average meter function will take a reading from everything in the image and average it to 18% middle grey.
When your camera (or dedicated light meter) takes a meter reading of 18% middle grey and provides you with the exposure settings, that does not mean they are the correct settings for the scene. Your understanding of the Ansel Adams zone system is essential to making an accurate exposure. When you look at a landscape that you are about to photograph, you should be capable of seeing what is 18% middle grey (zone 5). You should be capable of seeing what is black (Zone 0) and what is white (Zone 10). Practising this will increase your confidence. You will find that you will be adding exposure compensation until you are happy with the exposure of your images.

Figure 14 - Showing an image and its histogram that has been exposed to the right.
For a greater degree of accuracy using the spot meter, set the meter reading point to an area in the image that you want to be exposed to 18% grey, which is usually your main subject of interest. Then add exposure compensation. Alternatively, use centre weighted or average mode and adjust exposure compensation as required. Ideally, your histogram will show the most information in the middle or slightly to the right.
Exposure Compensation
The exposure compensation function in your camera allows you to increase or decrease the exposure, calculated by the camera’s light meter. You can adjust the exposure settings in your camera either below or above the meter reading to add exposure compensation. Exposure compensation changes the shutter, ISO and aperture setting. Alternatively, use the camera’s built-in exposure compensation dial. Landscape photographers generally adjust the shutter setting because they work off a tripod. Because light meters provide a reading that is 18% middle grey, exposure compensation is often required. For example, when you are photographing a landscape with snow, your light meter will set the camera exposure settings to 18% middle grey, which will provide an underexposed image because snow is brighter than 18% middle grey. Therefore exposure compensation of +1 stop or +2 stops is required for correct exposure.

Figure 15 - Shows an example scene exposure measured in EV values without any compensation.
One-stop means a measured amount of light will be doubled for +1 stop or halved for -1 stop. Every extra stop is doubling or halving on top of what has already been allowed. For example, your camera has metered its scene and has provided a shutter setting of 1/125th of a second. When you adjust the exposure compensation dial to +1 stop, the new shutter time will be 1/250th of a second. By moving the exposure compensation dial to +2 stops, the shutter setting will be 1/500th of a second. Adjusting the exposure compensation dial to -1 stop will reduce the original meter reading by one stop. The new shutter setting will be 1/60th of a second and so on. The same principle applies to the ISO setting and f. stop setting. Depending on your camera settings, exposure compensation is in 1/3 stop, 1/2 stop or one-stop increments. Using the 1/3 or 1/2 stop will allow for fine adjustment.

Figure 16 - Shows an example scene exposure measured in EV values with +1 stop of compensation.
Image Tonal Values (Luminosity)
When you add exposure compensation, you must understand its impact on the elements within your captured image from a tonal value point of view. Tonal value describes the brightness or darkness of each object within your image. When your camera meters the landscape, a result of 18% middle grey is provided. Referencing Figures 15 and 16 above, 18% middle grey is represented as zero (0). As you can see, not all of your image is 18% middle grey (0) because of the tonal range (also known as dynamic range or luminosity range) in the scene. There are shadow areas and very bright areas. When you add exposure compensation, it will increase all the tonal values in your image. The tonal values will move up or down by the applied amount. Not all digital cameras (or film types) have the same dynamic range. If you add too much exposure compensation, you may be pushing the camera (or film) outside of its capabilities. Too much exposure compensation will result in loss of detail due to overexposing to underexposing. If overexposure is required, you will need to use a graduated filter. Graduated filters control the increase to the brighter areas of your image. Alternatively, you will have to take multiple photographs (referred to as bracketing) with a view of blending them during post-processing (referred to as exposure blending or HDR). Underexposing is more difficult to deal with but, it is unlikely because landscape photographers are always trying to capture images during the times of the day where there is visible light. In most cases, you will be adding exposure compensation to brighten the shadow areas instead of reducing them.
Histogram
The histogram is a feature in most digital cameras sold today that allows photographers to preview the dynamic range and luminosity values of a scene they are about to capture by displaying it on a small graph. The histogram will display information in a way that is easy to understand. They will show it based on either black and white, red, blue and green (RBG); or, both depending on the camera. The left-hand side of the histogram is 100% black with no detail. The far right-hand side is 100% white with no detail. Everything in the middle is the mid-tones. It works the same way for the RBG channels, and the height (y-axis) represents the amount of detail on the luminosity scale (x-axis).
Figure 17. High Contrast Histogram
This histogram represents a high contrast scene and is what you should avoid when making your images unless you are aiming to create a high dynamic (HDR) style photo.
Most digital cameras can display a histogram in their viewfinders. On their LCD screens whilst they are being used to compose an image or during image preview; and, some cameras will do both. Figure 14 shows an example histogram from a scene that has lots of dark and light detail. But not very much mid-tone information.
For more information on histograms and interpreting them, I recommend you read my Understanding Light tutorial.
White Balance
White balance is a feature of all digital cameras that allows you to set the camera up to suit how the light is behaving at that time in your photography location. You must understand this as colour temperature as per Figure 18. The white balance settings of your camera should match the colour temperature of your scene. You can do this manually in your camera as per the instruction manual to your camera, or you can let your camera decide for you by leaving the white balance in auto mode. Remember that the white balance is changed during post-processing by you.

Figure 18. Colour Temperature in Kelvin
Use this image as a guide to white balance settings for your camera.
Whilst it is always a good idea to try and set up your camera’s white balance so that it matches the colour temperature of the scene, sometimes it is used in a creative way to change how an image looks by giving it a warm or cool tone. For example, you might be on a landscape photography photoshoot on a cloudy and, you want to make your image look warmer. You can do this by changing the white balance setting in your camera from overcast to partly cloudy with the sun.
Don’t be afraid of playing around with white balance. If you are shooting in RAW, your images are changed later during image post-processing.
Bracketing
Bracketing is a good feature for your landscape photographs for two reasons. The first reason is that it provides a safety net that can assist in making sure you capture the image they want with the correct shutter speed, ISO and aperture settings. Secondly, you may wish to photograph more than one image of the same scene with different shutter speeds, ISO, and aperture settings applied so you can blend the images into one during post-processing.

Figure 19 - Shows five bracket images with exposure times at 1/3 stop increments. The 0.8 second image is the correct exposure as calculated by the camera.
Bracketing is a feature in most digital cameras that allows photographers to set their camera for one press the shutter button and more than one image but with different settings applied to each image. Camera manufacturers provide customisable settings for bracketing in three to five images. When your camera is in bracketing mode, it will use the bracketing settings as set up by you. With a single press of the shutter button, the camera will adjust one setting. Your camera will change the shutter speed, aperture or ISO setting to each image. Bracketing will occur in 1/3 stop, 1/2 stop or one-stop increments. For example, assuming your camera settings will allow five image brackets at 1/2 stop increments and you have set it up this way, with one press of the shutter button, the camera will take five images. The first image will have zero stops added and will be as per the camera light meter settings as set by you. The four images after it will include two overexposed images. One will be + 1/2 stop, and the other will be +1 stop. Plus two underexposed images, one will be - 1/2 stop and the other will be - 1 stop. The same logic applies to bracketing of the ISO and aperture settings if selected instead of shutter speed in the bracketing settings. However, for landscape photographers bracketing in shutter speed is preferred. Image sharpness and ISO will remain the same in each of the bracketed images. The bracketed images are then easier to merge in post-processing.
Focus Modes
There are three focus modes that your camera will that you should know how to use. They are Manual Focus, Single Auto Focus or Continuous Auto Focus. The difference between the two is simple, and they are as their name suggests. Manual focus is done manually by rotating the focus ring on the lens whilst looking through the viewfinder or at focus peaking or a magnified part of your image. Single Auto Focus is done by half-pressing the shutter release button or by setting up one of the functions buttons on the back of your camera to be back button focus and pressing it. Single Auto Focus will focus on a single point within your image selected by you. It will focus on that point when the shutter button is half-pressed until you press the shutter button fully to capture your photograph. The lens will remain in that position until the button is half-pressed again. Continuous Auto Focus works in the same way as Single Auto Focus. Except the lens will continuously refocus on a selected area whilst the shutter button is half-pressed until you press the shutter button fully to capture your photograph.
You should note there are many different variants of Single Auto Focus and Continuous Auto Focus that camera manufacturers build into their cameras, and they are different from each other. Whilst taking landscape photographs, manual focus with a magnified view on your camera's LCD screen will give you control. Manual focusing will provide 100% reassurance that you are focusing in the correct place, and you get the best image sharpness. Single Auto Focus is the next best option unless something is moving in your image that you want to focus on or your camera is moving, then Continuous Auto Focus is preferred.
Camera Lenses
Every camera has a lens and will be permanently fixed to the camera or is interchangeable. Camera systems with interchangeable lenses will allow other lenses to be attached if the lens has the correct camera mount for the camera. There are many different types of lenses, and they can be generalised into two categories. There are prime lenses and zoom lenses.

Figure 20 - Showing a comparison between an APSC 16mm - 55mm zoom lens next to a 50mm 6x6 medium format prime lens.
Prime and zoom lenses are available for every camera, and the difference between the two is simple. The focal length in a prime lens is set to a specific focal length (e.g. 50mm) and cannot be adjusted. The focal range in the zoom lens is preset to operate between a focal length range (e.g. 24mm to 70mm) and is altered by you. The prime lens will provide a sharper image than a zoom lens because of its design. For example, prime lenses will perform the best because their design is for one focal length (e.g. 50mm). The zoom lens design will perform at its best throughout its whole zoom (e.g. 24mm to 70mm) and aperture range, so a zoom lens is a compromise. However, when you are choosing your lenses, zoom lenses cannot be overlooked. Zoom lenses have their strengths, and they offer a range of focal lengths in one lens. It will require three or more prime lenses to replace, and this saves weight. Although zoom lenses have more glass elements in them and depending on their f. stop range, they can be heavy, especially if they have a wide aperture (e.g. f.2.8). Using a zoom lens saves time because you don’t have to change the lens often, which improves your chance of getting your shot.
Camera lenses, whether they are primes or zooms, are generally categorised into four categories:
-
Wide Angle Lens- Range from 14mm to 30mm and are great for close-ups and emphasising the foreground or sky in landscape images. They will capture a large view and make any objects on the horizon appear smaller than objects in the foreground. If there is not much interest in the foreground or sky, you should avoid a wide-angle lens unless you want to create an appearance even of wide-open space. Distortion of straight lines is generally a noticeable characteristic that will need correcting in post-processing. Alternatively, the tilt-shift lens will allow you to correct distortion through its shift and tilt movements.
-
Standard Lens - Range from 35mm to 75mm and are great for capturing a view similar to what our eyes can see. They are great for compressing objects in the foreground and on the horizon, and they will appear closer to each other. These lenses are a good choice when there is not much interest in the foreground or sky. A large aperture number (e.g. > f. 11) is required to achieve a large depth of field unless a tilt-shift lens is being used, which will increase sharpness at smaller f. stop numbers by tilting the lens down a few degrees.
-
Telephoto - Range from 80mm to 400mm (+/- depending on the manufacturer). The telephoto lens is great for landscape photography images when you focus on small details in the landscape to emphasise them.
-
Speciality - Macro for very close up photography, Fish Eye (<14mm) for super-wide photography and Tilt-Shift for correcting lens distortion in architectural / landscape photography.
For landscape photography, one selection from each of the first three categories is preferable. Most landscape photographers will use three zoom lenses. They are the 14mm to 24mm, the 24mm to 70mm and the 70mm to 200mm. Remember, if you own zoom lenses with a wide aperture (e.g. f 2.8), they will be heavy. If you are an astrophotographer, a zoom lens or prime lens between 14mm to 24mm f2.8 is preferred. If you own prime lenses, I recommend the 24mm, 40mm and 90mm for landscape photography or as close to this as possible.
RAW vs JPEG
Most digital cameras can create images in RAW and JPEG by changing the camera's settings accordingly. It is possible to set up your camera to shoot purely in JPEG, or RAW, or both. The difference between RAW and JPEG is simple to understand. The RAW file contains more information, file sizes is large and is more flexible to edit. The JPEG file is a compressed version of a RAW file. It has in-camera settings (colour, sharpness, contrast, etc.) applied to them. The file size is smaller, and it contains less information which makes them less flexible for editing. Most photographers will shoot in RAW format. RAW provides maximum flexibility when editing during post-processing. RAW files contain a lot more useable detail in the shadow and brightest parts of an image. They respond better to post-processing, which results in better images for printing. RAW files are more flexible when making colour, contrast and sharpness changes because they do not have a fixed camera profile. The JPEG file is a good choice for minor post-processing. They can be printed straight from the camera and used for previewing.
Memory Card Slots
Camera manufacturers will always provide either one or two memory card slots in their cameras. Dual memory card slots are more beneficial to photographers because of their flexibility. If your camera has dual memory card slots, you can set it up to put all the RAW files on one card and all the JPEGs on the other. Or so that all the files go on to one memory card, then a backup version is made on the second memory card. Memory cards can fail, so it is always better to have a backup card just in case.
Learn the Strengths and Weaknesses of your Camera and lenses
Every camera and lens has strengths and weaknesses. So that you can understand how best to set up your camera system for the conditions that you want to use it in, you must become familiar with its strengths and weaknesses. For example, not all cameras are weather-sealed, resistant to rain and extreme hot/cold temperatures; some cameras have better autofocus systems than others. Some cameras have a more pleasing colour in their images because of the camera manufacturers colour science; some cameras and lenses function better in low light situations because of their technology and design features. Some cameras provide better low-light image quality because of the type of sensor used and its ISO characteristic. Some lenses render sharper results and more pleasing colour images than others because of their design characteristics. Hopefully, all your camera and lens requirements were thought through when you purchased them, but sometimes this is not the case.
Camera lens Filters
Landscape photographers use filters for controlling light in certain situations. They are three types of filters that you should know. They are the polariser, natural density (ND) filters and graduated ND filters. The polariser removes glare, ND filters reduce the amount of light coming into the camera lens, and graduated filters reduce the amount of light coming into a part of the lens. The most common type used by landscape photographers is the circular polariser. The polariser reduces glare, but it also reduces light coming into the camera lens between 1 to 2 stops, and it increases colour saturation depending on how you set it. ND filters are available in different strengths (1 stop up to 10 stops and even 15 stops). Graduated ND filters are available in different strengths (1 - 5 stops). The graduated filter types are soft edge, medium edge, hard edge, reverse, and horizon.

Figure 21 - Showing a comparison of a photograph with and without the polariser. The polariser effect is most noticeable on the green leaves.
Using a polariser, ND filters and graduation ND filters requires practice. The principal function of the polariser in landscape photography is to remove glare and increase colour saturation and contrast as shown in Figure 21 above. The polariser can provide different results depending on the position of the sun. It gives a strong effect when used at 90 degrees from the sun. It is possible to use it when it is not at 90 degrees, but it will provide a weak effect. Be careful when you use a polariser on clear skies because they create a dark banding effect as shown in Figure 22 below.
![]()
Figure 22 - Showing the effect of a circular polariser on a clear blue sky.
The ND filter reduces the amount of light coming into the camera lens. It helps maintain a wide-open aperture (e.g. f 2.8) in bright conditions when your camera shutter does not have a speed fast enough. Or, you want to reduce the amount of light coming into your lens because you want to create a long exposure effect. For example, to create a smooth effect in water or clouds as shown in Figure 23 below.

Figure 23 - Showing a comparison of a photograph taken with a natural density filter and without. The effect is more noticeable in the water and sky.
The Graduated ND filter is a good option for controlling a high dynamic range landscape. Most digital cameras can photograph a high dynamic landscape (except when shooting directly into the sun). However, some digital cameras (or film) cannot. As shown in Figure 24 below, the Graduated ND filter reduces light in the sky area of your image to preserve detail in the scene due to the dynamic range limitations. When the sun is on the horizon, a reverse graduated filter helps by reducing the light on the horizon by four stops. Even though most digital cameras handle high dynamic landscapes, the post-processing of the very dark and very bright areas of your image can lead to unwanted halo; and arbitration effects on the edges between dark and bright objects.

Figure 24 - Shows the effect of a 2 stop medium edge graduated filter when it has been placed to reduce the brightest areas of an image. The bright sky and snow was +3 stops and it has been reduced to +1 stop
Plus, there will be unwanted digital noise in the deep shadow areas and is where a soft or medium; or hard edge graduated filter will help. When you are photographing a high dynamic landscape, the two or three-stop graduated filter is applied to reduce the brightness of your sky area. When you use a graduated filter, you can increase your shutter speed time. The mixture of the graduated filter and increasing the shutter time will brighten the shadow areas without overexposing the brighter areas. To determine which strength of filter to use, use your camera's light meter to measure the difference in stops between the sky and foreground area that you want to be neutral (18% grey). However, in most cases, a 2 or 3 stop filter will be enough. Alternatively, multiple exposures can be taken using bracketing and then merged into one image during post-processing as a high dynamic range (HDR) image, but this requires more time to process the image.
Graduated filters are available with a hard, soft or medium edge; and are used for different types of landscape images. The hard edge filter will darken a sky when there is nothing on the horizon, and it can align with the horizon. The soft edge filter will darken the sky that does not have a flat horizon because of many mountains or other objects on the horizon that you do not want to be as dark as the upper part of the sky. The medium edge filter will darken the sky with many objects on the horizon, and they do not have to remain a similar tonal value as the foreground. In my experience, I use the medium edge graduated filter the most because it is a happy medium between the other two, and most of the time, my images have objects on the horizon.
There is one more filter that is worth mentioning, and it is a UV filter. Many landscape photographers use these filters as a protective layer. The UV filter is a screw-in type and is permanently on every lens I own to protect the front glass element of my lenses from scratches, impact damage, and cleaning.
Tripod and Height
The use of a tripod in landscape photography has benefits. It provides a stable base for your camera that assists in capturing sharp images. The tripod is essential for capturing images with long exposure times, and it acts as a platform for you to work from by freeing your hands up to use filters.

Figure 25 - Showing a camera on a tripod, the tripod allows the hands to be used for other things like adjusting filters.
If you are using a tripod, it is relevant to consider its position and height with the subjects in your images and the type of lens you are using. For example, positioning your tripod closer to the foreground subjects will emphasise and enlarge them. Lowering your tripod height closer to the ground will make the foreground objects closer to the horizon. Depending on the lens you are using and how close your camera is to the ground. The foreground area at the bottom of the image may be out of focus. The wide-angle lens is more capable of enhancing foreground objects. It will capture sharp detail in the foreground area closest to the bottom of the image compared to a telephoto lens. Lowering a telephoto lens to the ground is a way to soften detail in the foreground that does not add any value to your image, like the example shown in Figure 26 below.

Figure 26 - Shows how a telephoto lens can be used in landscape photography when it has been lowered close to the ground, which makes the foreground detail very soft.
When composing your images, it is better to find your composition before you set up your tripod. You should try handholding your camera and look through its viewfinder whilst you move around your objects of interest, then try moving closer and then further away. Try lowering your camera closer to the ground, and then try different lenses in the same way. Once you have found a composition that you are happy with, then set up your tripod. Now your tripod is set up, scan the image and the edges of the frame. Next, you should make finer adjustments to the position and height of your tripod until you are happy with the objects in the image and their relationship with each other and you have removed anything unwanted from the image.
Taking photographs in bad WEATHER
The weather plays a role in landscape photography. It is essential to consider the weather forecast during the planning of your photos. Not only does it have an impact on the look and feel of your images, but it also can affect your photography equipment. Most cameras sold today are weather-sealed from dust and rain. They are not 100% sealed, meaning they should not go underwater, but they can withstand a wet downpour or dusty environment.
As a contingency for protecting your photography equipment from bad weather, you should carry a bag with you that is 100% waterproof, like a dry bag that you can use if you get caught in bad weather. You can keep a couple of microfibre cloths in your camera bag. They will help protect the front of your lens from water splashes in downpours when you have your camera setup, you are waiting for the light, but it's raining. Plus, they are essential for wiping down your camera equipment when it is wet and before you put it back in your camera bag. To help my camera equipment stay dry, I put some silica sachets in my camera bag to help soak up any moisture that may be present. When you finish photography for the day and if your camera equipment is wet. When you are in a dry room, you should remove your camera equipment from your bag to dry off and air out.
Extreme temperatures can affect your camera as well. In cold temperatures, the battery in your camera will lose its charge very quickly, so it is always handy to carry spare batteries. Taking the battery out of the camera and storing it somewhere warm, like inside your insulated jacket or sleeping bag, will help it hold its charge. The cameras themselves can be affected by temperatures, and condensation can be problematic. Acclimatising your cameras slowly to significant temperature changes will help stop condensation. Leave your camera equipment in your camera bag for a few hours when you move from a cold temperature to a warm one and vice versa. Also, note your camera operating temperature so that it does not overheat or freeze. If ice forms on the front of your camera lens or filters, wipe it off with a microfibre cloth.
Camera and Lens Maintenance
Keeping on top of the maintenance of your camera equipment is a good way of helping make sure your equipment always works as expected. The creeping of dust into your camera and its lenses is a common problem. Using a rocket air blower is an easy way to keep on top of dust removal from the glass elements of your lenses and of your camera sensor. Make sure you clean the lens and body caps as well. Dust will eventually become unmanageable and hard to remove. Contact the manufacturer of your camera for help. They will recommend a service agent local to you.
I hope you have enjoyed reading this blog, and I hope you have taken something away from it.