New Zealand Landscape Photographer Talks How to Plan Landscape Photos
Share
A New Zealand landscape photographer tutorial
New Zealand landscape photographer Stephen Milner talks about how to plan a landscape photography trip. This blog is part of his HOW TO TAKE LANDSCAPE PHOTOS - TEN STEPS TO CREATING SUCCESSFUL LANDSCAPE IMAGES tutorial series.
For a list of landscape photography equipment that I use, please check out My Gear List.
In this tutorial, I will share how I plan my landscape photography tips and the tools I use.
When I plan my landscape photography trips, the two aspects I consider the most are light and composition. There is a trip planning process that I go through that investigates potential subjects to understand when will be the best time to visit a location. If you haven’t already done so, I encourage you to check out my tutorials on light and composition, and for this tutorial, I will be focusing on the subject of trip planning.
If you want to be successful, you have to set yourself up for that success. Hopefully, it’s no surprise to you that it is the same with landscape photography. The planning process I use is simple, and once you understood it, I am confident that you be on your way to becoming the best landscape photographer you can be.
During this tutorial, I explain the planning process I go through. I will provide examples of the tools I use. This planning process is essential for both day trips and multi-day trips.
There are six steps that I go through during my planning process, and they are:
-
Finding Inspiration and image visualisation
-
Location selection
-
The best time to visit your location
-
Weather
-
Safety
-
Make a plan
1. Finding INSPIRATION and image VISUALISation
I tend to find my inspiration in two ways. The first way is by location scouting and the second way is by researching a location online. Sometimes I will investigate a potential photography location online first and then scout that location in person later. For me, there is nothing better than getting outside and exploring new photography locations. It is the part of photography that I love the most and is a great way to scout other locations. When I am exploring, on my own or with my family, I always look for new landscapes to photograph. Over time I have trained my eyes to look out for landscapes that I know will work well. When this happens, I make a mental note, mark its GPS location with my phone or a GPS device, and when I return home, I research the location in more detail.

Figure 1. Google Images Broad Key Word Search.
Sometimes I will be travelling somewhere completely new and have no idea of what to expect. Before I arrive at a photography location, I like to do some research to see how the landscape of that location looks. For me, I find the best tools to use for this are Google Images and Pinterest.
As a precautionary note, whilst I look at images to find inspiration, I do not try to recreate other peoples work, and I hope you do not read this as though I am suggesting that it is a good idea to do so. Finding inspiration from other peoples work is ok, and it is always nice to mention the other photographer when you talk about your photo if their work inspired you.
Figure 1 is an example of a google images search using a broad keyword description (e.g. New Zealand Landscape). I generally do this to find locations and then do multiple keyword searches to refine my selection.

Figure 2. Google Images Refined Key Word Search.
Figure 2 shows a refined search (e.g. Lake Pukaki New Zealand Landscapes) in Google Images. This location is worth visiting to create my unique landscape photos. Another great feature of Google Images is the ability to do research using a mobile device. I often have to change my plans (due to weather) on the fly, and using Google Images on my phone helps a lot.

Figure 3. Using Pinterest to Collect Inspirational Images.
interest is another excellent tool that I use for searching locations. Pinterest allows you to set up an account, search images and then pin them to custom boards. It is a great feature, and I use this a lot through their mobile app. As long as I have a signal on my phone, I can log in and view my Pinterest boards at any time. Figure 3 shows a board that I have set up, and I have pinned inspirational images.
Image visualisation is an essential step in the planning process. The process that I have described above is how I start to visualise my images. Whilst I look at other people’s work from the locations I intend to visit, I always approach them to create something unique to me, and I encourage you to do the same. If you can capture one photograph from a popular location that is different, then you have done well.
2. LOCATION selection
Once I have inspiration, the next step is selecting the locations of possible compositions. This process is easy if I have already seen the photography locations in person. However, as you go through the location research process, I use Google Earth to plot out the photography locations I want to visit, especially if I am going on a multi-day trip. I do this by using the pin tool in Google Earth to mark my locations. Once I have all my locations plotted out, I import them into the Google Earth mobile app, and I access them on the move.

Figure 4. Google Earth Pin Tool.
Figure 4 shows the Google Earth desktop app with three pins marking locations that I would like to visit around Mount Cook in the South Island of New Zealand. When I pin these locations, I will make a note that shows whether it is a sunrise location or a sunset location. At the same time, I will pin the locations of my accommodation for each night, so I can see how they relate to my photoshoot locations, which I find helpful for establishing travel times.

Figure 5. Using Google Earth to Refine Location Selection.
Another fantastic feature of Google Earth is its photos in and around the locations I plan to visit. It is possible to use this feature via the desktop app and the mobile app. This feature is essential for finding inspiration when I am travelling around and have to adjust my plan. Figure 5 shows an example of an image that can be seen from the Google Earth desktop app. This feature helps the visualisation of my locations. One word of caution, the accuracy of these images is dependant on the person uploading them. It always pays to look at more than one image in any location to determine its accuracy.
3. THE BEST TIME TO VISIT YOUR LOCATION
Once I have picked the locations that I want to photograph, the next phase of my planning process is to determine the best time to visit each photography location. Generally, the four factors that I consider the most are:
-
Light;
-
Weather;
-
Season of the year; and,
-
Tide (for costal seascape shots).
LIGHT
An essential step when you create a plan for landscape photography is to understand how the light will behave at a location you plan to visit before you arrive. There are two tools that I use to do this, the first one is The Photographers Ephemeris, and the second one is the Google Earth Desktop App. It is worth noting that there are other similar tools like PhotoPills.
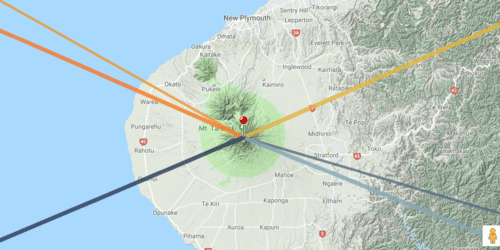
The Photographers Ephemeris is a web-based app developed by Crookneck Consulting LLC. It is a photography planning app that allows its user to investigate potential locations and understand the lighting conditions at that location at any given time. There is a lot of information that is in this app, which includes: google maps and satellite images; date and time; location; sunset and rise times; sunset and rise directions; moon set and rise; and, all this information is displayed visually on a map at any location on the Earth as shown in Figure 6. For landscape photographers, this is great because it helps us determine when is the best time to visit a location, and we can see the direction of both the sun and the moon.

Figure 6. The Photographers Ephemeris shows set and rise times for the sun and the moon.
When you add the location and preferred date/time to The Photographers Ephemeris, the information to consider is:
-
Sun direction and elevation
-
Moon direction and elevation
-
Terrain
The Photographers Ephemeris will show the direction and elevation for both the sun and the moon. How you use this information will vary between different photographers and the style of image that are desired. If you haven’t already done so I encourage you to check out my tutorial on light.

Figure 7. The Photographers Ephemeris showing the distance and altitude information between a camera location (grey pin) and Mount Cook (red pin).
It is essential to look at the terrain when planning your landscape photography trips, especially if the location has many mountains and valleys. The Photographers Ephemeris has a secondary pin (grey), and it will help you understand how the light will behave in any given terrain. Figure 7 shows the red pin on Mount Cook and a grey pin at a potential camera location. When you move the red pin around, you can check the altitude of the surrounding landscape relative to your camera location. This feature will provide altitude information to compare against the elevation of the sun and the moon.
From looking at Figure 7, I can see that on the 12 January 2020 at Mount Cook in New Zealand. The sun will set to the South West at 20:45 at an altitude of +5.2 degrees, and the altitude of Mount Cook is +7.13, which means at sunset, it will have golden light, but the camera location will be in shadow.
The Photographers Ephemeris is a great tool, and it can be viewed for free on any computer via a web browser, or it is purchased and downloaded to a mobile device from the Apple Store or the Android Store.
Whilst The Photographers Ephemeris is excellent at providing a bird's eye view with plenty of the technical information needed to plan successful trips, sometimes a 3D view of the landscape is helpful.

Figure 8. Google Earth in street view mode with the show sunlight across the landscape feature switched on.
Figure 8 shows Mount Cook in the Google Earth Pro desktop app with the street view and show sunlight across the landscape features switched on. This feature is used for your desired photography location and at any time. However, you will see that the date and time are different from The Photographers Ephemeris. The latest satellite imagery of New Zealand from Google is possibly not as up to date as other countries. However, you will see what the landscape will look like at any given location, date and time.
4. weather
Weather plays an essential part in landscape photography, and it can either make or break an image. When you plan your landscape photography trips, be aware the weather is unpredictable. When I plan multi-day trips, I look at monthly weather trends on websites like Weather & Climate, as shown in Figure 9 and Holiday Weather. The type of images I want to create will influence what month I choose to visit a location.

Figure 9. Weather & Climate showing monthly averages for Mount Cook in New Zealand.
Once you have confirmed all of your travel plans, then you are in the hands of nature. When you arrive at your location, it is best to approach your landscape photography with a positive mindset regardless of the weather. Remove any perceived expectations and accept the outcomes for what they are. At this point, all you can do is plan around the weather on a week by week basis.

Figure 10. Weather Underground ten day forecast.
Whether you are on a multi-day trip and planning around the week's weather or simply planning a one day trip, short term weather is easier to manage. There are three websites that I like to use for short term weather forecasts, and two of them have mobile apps. The first one is Weather Underground; the second one is Clear Outside and, the third is Mountain Forecast.
The weather forecast that I like to use the most is Weather Underground, as shown in Figure 10. It is simple to use, provides a reliable ten-day forecast and has a lot of information. Its sources its data from thousands of private weather stations. You can access an interactive map and click on a weather station close to where you want to visit. You can customise the data that you want to see, which is excellent.

Figure 11. Clear Outside weather forecast.
Figure 11 shows Clear Outside, and it is the second tool that I like to use for forecasting the weather. This app is easy to understand, provides a seven-day forecast and uses satellites for its data collection. The feature I like the most is the information on clouds. It shows clouds in three categories which are low, medium and high. Each type of cloud can impact an image differently. Low and medium clouds are not great for mountains and sunsets/sunrises unless you are above the clouds. Although, they work well for long exposures and black and white photos. High clouds are great for sunsets and sunrises, plus work well for long exposures and black and white photographs. The UCAR describes the three types as clouds as:
-
Low clouds in the atmosphere are stratus, cumulus, and stratocumulus.
-
Medium clouds include altocumulus and altostratus.
-
High clouds in the atmosphere are cirrocumulus, cirrus, and cirrostratus. Cumulonimbus clouds can also grow to be very high.
The UCAR has some great information on cloud types, with example photos and an explanation of each cloud. To learn more about clouds, I highly recommend you check their website out here.

Figure 12. Mountain Forecast.
The third website I like to use is the only one I have talked about that does not have a phone app. Mountain Forecast provides some useful mountain-related information, and it is my go-to website when I am planning mountain photography.
Figure 12 gives an overview of the user interface, and as you can see, it provides a six-day forecast, includes a weather map, wind speed and wind chill information at different altitudes. If you plan on doing any mountain photography above an altitude of 1000 meters, please be aware of the wind speed and wind chill factor before you arrive. Landscape photography in the mountains at low temperatures is dangerous, especially if you do not have the correct equipment with you.
If you plan a landscape photography trip to a mountain region and there is snow, I highly recommend paying attention to the local avalanche information. It is essential to prepare for your landscape photography that is away from public areas.

Figure 13. Images from Winter, Spring, Summer and Autumn.
As you are aware, there are four seasons in a year. When you plan your landscape photography, trips it is essential to consider the look and feel of each season and how they will affect your photos. For example, Figure 12 shows four of my images taken during winter, spring, summer and autumn.
The final weather-related topic I will quickly talk about is the ocean tides. When I plan landscape photography trips around coastal areas, I always do some research before I arrive. I have been to some locations that are only accessible at low tide, so as you will appreciate having some knowledge of tide times is essential.

Figure 14. Tides Near Me.
The website I like to use for tide information is Tides Near Me, and it has a free phone app. This app is easy to use, and it provides tide information in a simple way, as you can see in Figure 14.
5. SAFETY
Safety is essential to keep in mind, especially when you are chasing sunrise and sunset light. I remember a few years ago when I was climbing Mount Tongariro in New Zealand during winter. The mountain had snow that had turned into ice. The weather was clear, and a few other climbers were making the same trip. Most people were wearing the correct safety equipment for winter mountaineering except for two people. I remember walking up a ridge line past these two people, and they were crouching on the edge of the snow-covered ridge line taking a photo with their phones and wearing running shoes. Winter mountaineering and running shoes are not a good idea, which is why everyone else was wearing crampons, had an ice axe and a helmet. I remember thinking if they slip they would have slid off the mountain and probably would not have survived.

Figure 15. World Nomads Safety Alerts.
When you travel to a new country and have no knowledge of it, I highly recommend that you do as much safety-related research before leaving your own country.
World Nomads has some great information on safety alerts that are country and location-specific, as shown in Figure 15. It is essential to avoid arriving in a country that has safety alerts that will affect your trip. The safety of yourself and your friends should always take priority over capturing the image that you want.

Figure 16. Garmin InReach Mini.
If you plan to travel to a high-risk location with no mobile phone signal, I highly recommend carrying a personal SOS device. The GPS Garmin Explore, the SPOT’s Satellite GPS devices, or a GPS Personnel Locator Beacon are good options. They can be used anywhere in the world without the need for a mobile phone signal.
I use the Garmin Explore Mini, and it has a GPS SOS alert. It will send text messages via satellite to my family and friends. It pairs with my mobile phone, and I can use my phone to operate it. A bonus feature is the ability to use waypoint marking locations on a map for future reference.
6. MAKE A PLAN
So, you are now full of inspiration, and you have a good idea of where you want to be. The next step is to document your plan. There are many different ways that you can do this. I am a visual person, and I like to display my plans. So I can have a broad view and then go into the detail as needed. Figure 17 shows a plan I made a few years ago for a two week South Island trip in New Zealand. On the map, I marked out each photography location and accommodation. Recently, I have been using the Calendar and Note apps on my computer, which then synchronises with my phone. The digital version is great because I can access them on the move, and I use them in combination with other apps on my phone, for example, The Photographers Ephemeris. Other apps like Evernote are also great for writing out plans. Depending on where you are planning to go and considering the power available for charging devices, a combination of hardcopy and softcopy plans could be ideal.

Figure 17. My Two Week South Island Plan.
Finally, If you are going overseas, please make sure you share your plan with your friends and family for emergencies.
The best Plan is one created and then improved
Throughout this tutorial, I have explained my approach to planning both single day and multi-day trips. My experiences have shown me that having a robust plan is essential for creating successful images. Hopefully, you now have a better understanding of the skills used for planning landscape photography trips. During sunrise and sunset shoots, the light changes dramatically and quickly, and the time during these periods is short. With this in mind, it’s essential to plan your shots, and this will put you in the best possible position to creating a successful image in the best possible light.
There are other topics that I have not talked about in detail throughout this blog that I think you should consider when you are creating your plan. The first is your Equipment Selection and is essential to consider. Equipment Selection can influence both the quality of your images and the enjoyment of your landscape photography adventures. If you plan to hike up a mountain and with two cameras and all of your prime lenses in your backpack, you may regret it.
The other topics you should be aware of are photography equipment skills, booking accommodation, packing and insurance. I recommend that you have good photography equipment skills before you travel on a multi-day trip. I have not talked about booking accommodation, packing and insurance in detail because they are already well-understood topics. However, they are essential to consider when you plan your trips.
Finally, there are two pieces of advice that I will share with you. When you are in the field taking photos, please make sure that you forget about all the technicalities. Be in the moment, and don’t be afraid of failure. Reflect on your trip and images when you return. Self-reflection is a powerful approach to understanding your strengths and weaknesses, and I will write a separate blog on this in the future.
I hope you have enjoyed reading this blog, and I hope you have learnt something new.

