New Zealand Landscape Photographer Talks Photography Composition
A New Zealand landscape photographer tutorial
New Zealand landscape photographer Stephen Milner talks photography composition technique. This blog is part of Stephen's HOW TO TAKE LANDSCAPE PHOTOS - TEN STEPS TO CREATING SUCCESSFUL LANDSCAPE IMAGES tutorial series.
For a list of landscape photography equipment that I use, please check out My Gear List.
When I plan my landscape photography trips and create landscape photos, the two aspects that I consider the most are light and composition. There is a trip planning process that I go through that investigates potential subjects to understand when will be the best time to visit a location. For this tutorial, I will be focusing on the subject of composition.
In this tutorial, I share my learnings in understanding composition when shooting landscape photos. I explain the different composition techniques you can use and how you can use them in your landscape photos, as shown in Figure 1.

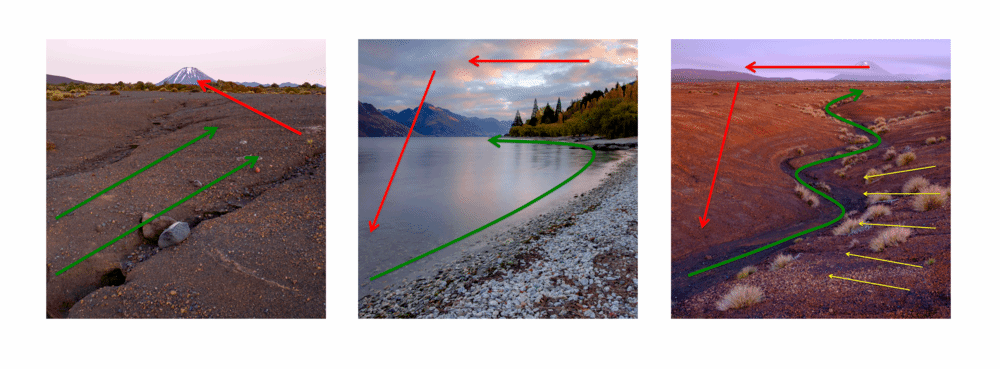
Figure 1 Composition Types
This illustration compares three different types of compositional tools. They are diagonal lines, curves and s-curves.
GUIDING YOUR VIEWERS EYEs THROUGH YOUR IMAGES
Before I discuss compositions further, I think it is essential to consider how the eyes work. In what we consider as being the western world, we read from left to right. Over many years our eyes have been trained to start on the left and mover to the right. When you read words or look at photographs, your eyes naturally move from the left to the right. It’s second nature for eyes to work this way, and when they do, it feels comfortable to them. Contrastingly, and in many cases, when it works the opposite way, it can feel uncomfortable unless you come from a country that reads from right to left or top to bottom.
When I am composing an image out in the field, I take a moment to let my eyes scan the viewfinder in my camera a few times and check if the composition I have arranged is working or not. Your eyes should feel comfortable with your photography compositions. They should move around your photo naturally and with ease and without getting stuck anywhere in your image.
IMAGE DESIGN
When you are composing your landscape photographs, you are essentially designing an image. When you use composition on your landscape photos, you will move your camera position. You place objects from the landscape in the frame of your camera and your chosen aspect ratio. It is essential to create a connection or relationship with your foreground interest and your main subject. I try to do this by looking for details and shapes in the foreground of the surrounding landscape. These details are diagonal lines, curves and s-curves. Once I have found my foreground detail, and it connects to my main subject of interest. I then try to balance the two in my frame with my chosen aspect ratio. To help your eyes with this, you must use the viewfinder on your camera. Your camera's viewfinder will help you cut out the surrounding views so you can focus on your composition.
SPACING
When you are framing your landscape photography composition, you must consider the spatial distances between your main subject of interest and your foreground detail, plus the spacing around the edges of your frame. Next, decide what lens to use, where to place your tripod and the height of your camera.

Figure 2 Wide Angle vs Telephoto
This illustration is a hypothetical comparison of an image taken with a wide-angle lens and a telephoto lens with a camera height of 2m. The tripod placement of the wide-angle illustration is closer to the foreground subject when compared to the telephoto illustration.
LENS FOCUL LENGTH CHOICE
Generally, I use a 25mm wide-angle lens, a 40mm lens or a 75mm telephoto lens. The 25mm is wide enough to capture good foreground detail or sky detail without miniaturising subjects on the horizon. The 40mm lens will remove unnecessary foreground and sky detail and is referred to as a normal lens because it is close to how our eyes see. The 75mm lens allows me to capture more focused detail on the horizon.
Wide-angle lenses are great at photographing a wide view of the foreground and sky. When used correctly, they should emphasise one of them. A wide-angle lens will enlarge subjects close to the camera. Objects on the horizon will appear smaller. The spacing between the foreground and horizon will be greater than a telephoto lens, as shown in Figures 2 and 3.
Telephoto lenses are great for capturing a more focused shot of a subject in the distance. Depending on how an image is composed, a faraway subject will have more presence in the photo, and it will be larger than a wide-angle lens. It is possible to capture foreground detail with a telephoto lens, and the spacing between the foreground and horizon will be more compressed, as shown in Figures 2 and 3. Creating an in-focus depth of field in the near foreground is difficult with a telephoto lens.
The normal lens is a happy medium between a wide-angle lens and a short telephoto lens. The normal lens will enlarge objects and give some compression. They can create an in-focus depth of field by using an f.stop greater than f.16 They cut our foreground and sky, but they leave enough to be used with detail if needed.

Figure 3 Wide Angle vs Telephoto
This comparison illustration shows a hypothetical image taken with a wide-angle lens and a telephoto lens with a camera height of 1m. The tripod placement of the wide-angle is closer to the foreground subject when compared to the telephoto illustration.
TRIPOD PLACEMENT
The lens focal length that I use generally dictates where I place my tripod. For a wide-angle shot, I know that my 25mm lens will capture full image sharpness when my tripod is within one meter from my main foreground subject. My normal lens will full image sharpness at two meters. My telephoto lens will achieve full image sharpness at five meters. Once I have my tripod location figured out, I decide the of height my camera.
Most of the time, my tripod height is between 1m and 2m, which is a personal preference. Whilst photos taken lower the 1m can look great, I am mindful that we spend most of our time looking at the world at a height somewhere between 1m and 2m. The deciding factor on my final tripod height is my desired spacing between my foreground and horizon subjects. It is essential to choose a tripod height that balances the spacing between your foreground and horizon subjects. Plus, the spacing around the edges of your aspect ratio. Essentially, you should make a strong connection between your foreground and horizon subjects whilst allowing the image to breathe. Figures 2 and 3 above provide a comparison of different tripod heights for a wide-angle and telephoto lens.
Before you set up, always find your desired tripod location and height by hand-holding my camera first. In my experience, this helps with my composition creativity and helps make sure I get the best camera location.
Types of composition
Composition is one of the essential aspects of landscape photography, and there are many options. The landscape photography composition tools that I like to work with are; diagonal lines; curves; s-curves; relationship; symmetry; and, the rule of thirds. These are the go-to compositions that I always look out for when I am in the field, and I use them to connect the foreground or sky and my main subject of interest. In some cases, the compositional tool is the main subject of interest because of its strength in my photo. Below, I discuss each of my go-to compositional tools; and I provide examples.

Figure 4 Diagonal Lines
This image will show prominent diagonal lines in the foreground. The lines will encourage your eyes from left to right and up towards the volcano in the distance. My 25mm lens captured this photograph.
Diagonal Lines
When I am out in the field photographing the landscape, I often look for a diagonal line. The diagonal line is a strong compositional tool is used to lead the viewer's eyes through an image. It is a valuable tool for foreground and sky detail.
I often look for a diagonal line in the foreground, as shown in Figure 4, which shows two lines. I find the diagonal line simple to find and use. It is an easy tool to connect with your main subject of interest, which in Figure 4 is the volcano.
When I look at the image in Figure 4, I find that my eyes start at the foreground stones in the cracks. They then follow them up through the image towards the volcano. My eyes rest on the volcano for a moment, and then they move down the image towards the foreground. I find that my eyes move around this image in this way with ease.

Figure 5 Diagonal Lines
This image shows a solid diagonal line upwards leading from left to right, into the sky and the negative space. My 75mm lens captured this photograph.
Figure 5 shows how to use a diagonal line with a telephoto lens. Telephoto lenses often simplify an image due to their focused view. In some cases, it is easier to work with a telephoto lens and pick out shapes in the landscape that can create images with a strong diagonal line.
When I look at the image in Figure 5, my eyes focus quickly on the two trees in the bottom left of the photo, which are in nice light. My eyes follow the dark trees on the mountain from left to right diagonally up through the image and then left into the negative space. My eyes rest in the negative space for a moment and then return to the two bright trees in the foreground. My eyes enjoy moving around the photograph in this way.
The diagonal line is a strong compositional tool, and it is applied to encourage the eyes of a viewer through a photograph. I often look for diagonal lines in the foreground and sky. I try and use them to make connections to my subject of interest. It works well with wide-angle and telephoto lenses.

Figure 6 Curves
The compositional tool in this image is the lake edge, which has a curve from left to right. My 25mm lens captured this photograph.
Curves
I enjoy finding a curve in the landscape to use as a foreground compositional tool. It is an excellent choice for leading the viewer's eyes through my images, as shown in Figures 6 and 7. The curve is a much stronger compositional tool than a line because it has a more organic and natural flow that my eyes find pleasing. In Figures 6 and 7, my tripod height is two meters high, which helped my camera look down on the foreground to emphasise the curve.
When I look at the photograph in Figure 6, my eyes are immediately interested in the curve in the image. My eyes follow the lake edge through the image from the bottom left up towards the autumn trees and then towards the mountain in the distance. From this point, my eyes scan over the bright contrasting light in the sky, and they then move down the image to the calm and smooth water where they rest for a while. They then move back to the curve of the lake edge. My eyes continually move over the image in this way.

Figure 7 Curves
This photograph shows how to arrange coastline rocks in the surf to create a left to right curve. My 25mm lens captured this image.
The image in Figure 7 shows how to arrange objects in the foreground to create a curve for a compositional tool. This curve required micro-adjustments of my tripod location and height to create it. Micro adjustments of the tripod were necessary to form a strong relationship between the curve and the mountain in the distance.
When I look at the photo in Figure 7, my eyes focus immediately on the curve in the foreground. They then notice the tonal differences between the rocks and the mountain. They look back and forth at the two for a moment. My eyes follow the curve from left to right up the image, over the mountain and into the sky. They then return to the foreground curve. My eyes continually move over the photograph in this way.
The curve is a strong compositional tool because it is organic, and when you find one, it will be obvious. When I find one, I will use it as a tool to lead the eyes through the foreground. In my experience, It works well with a wide-angle lens but is more difficult to use with a telephoto lens.
S-CURVES
In my opinion, the S-curves is a much stronger compositional tool than a line or a curve. It is exceptional to work with, and it is excellent at leading eyes through an image. As shown in Figure 8, natural S-curve's will be in the foreground, or as shown in Figure 9, you can create it by connecting shapes in the foreground and the sky.

Figure 8 S-Curves
This image shows how the elongated S-curve will lead the eyes through a photograph towards a subject of interest. My 25mm lens captured this photograph.
When I look at Figure 8, my eyes instantly look at the S-curve that weaves through the foreground. The tonal differences between the dark river bed and the surrounding foreground help my eyes focus on the S-curve. My eyes follow it from the bottom left up through the image towards the volcano, where they settle for a moment. They then move to the left and down through the negative space back towards the river bed. My eyes move through the image in this way continually and with ease.

Figure 9 S-Curves
This image shows how lines in both the foreground and sky can be arranged to create an s-curve through an image. This image was taken using a 16mm lens.
The image in Figure 9 shows how to arrange lines in the foreground and sky to create an S-curve. To make sure I had good coverage of both the foreground and sky, I used a 16mm lens, and as you can see, most of the image shows the sky. To do this, I had my camera angled upwards whilst leaving just enough of the foreground in the image so that the rocks created an interesting leading line into the photograph. Next, I made micro-adjustments of my tripod position until the lines in the foreground and sky connected.
When I look at Figure 9, my eyes start at the dark rocks surrounded by the white surf of the water in the foreground. My eyes follow the rocks from left to right up towards the brighter pink hues on the horizon. They then follow the pink clouds to the left and then to the right up through the image. My eyes continually move through this image with ease.
In my opinion, an S-curve is the strongest leading line compositional tool. Also, the S-curve is created by connecting shapes together, and it is exceptional at leading the eyes through an image. It works well with wide-angle lenses, and with the care, with a telephoto lens.
RELATIONSHIPS
The use of a relationship-based compositional tool is another excellent way to compose landscape images. In my experience, for a relationship-based composition to work well, there should be a strong tonal difference between the objects in the photograph, as shown in Figures 10 and 11. The combination of careful object placement and their tonal values create a compositional tool. It is a tool I use when I am out in the field.

Figure 10 Relationships
This image shows how tonal differences can be used to create relationships as a compositional tool. This image was taken with a 25mm lens.
Figure 10 shows a dark rock placed centrally in the foreground, and it has lots of contrast against the snow. When I look at this image, this contrast catches my eyes first. My eyes then notice the tonal difference between the foreground rock and the soft morning light on the mountain in the distance. When I was composing this image, I focused on the location of the foreground rock relative to the mountain. The spacing between them and the spacing around the edges of the frame is essential to consider. I tried to make sure that they have room to breathe yet feel connected. The tonal differences between the snow on the mountain and the exposed rocks stand out. My eyes notice the diagonal lines formed by the exposed rocks. They lead my eyes from left to right into the sky, which has negative space. My eyes rest there for a minute and then move back to the dark foreground rocks. My eyes continually move through the image in this way.

Figure 11 Relationships
This image shows how the placement of a subject in an image creates a compositional tool. My 25mm lens captured this image.
When I composed the image in Figure 11, I wanted to use the volcanic rock as the foreground interest. Knowing how my eyes like to work, I intentionally placed it on the left. At the same time, I was paid close attention to how it relates to the mountain in the distance. I wanted to allow enough space between them so they can breathe but make them feel connected.
When I look at the image in Figure 11, my eyes focus on the volcanic rock in the foreground. Next, they move to the diagonal lines in the mountain. The diagonal lines guide my eyes up through the image from right to left into the sky, where they rest for a minute in the soft hues of the morning light. My eyes will move through the image in this easily.
A relationship based composition is another excellent tool for landscape photos. In my experience, for it to work well, they require a strong tonal difference and the careful placement of objects in the image. It works well with a wide angles lens and a telephoto lens.
SYMMETRY
Another compositional tool that can be great to work with is symmetry. Lakes with still water and surrounding mountains are excellent for symmetry photographs. When I work with symmetry as a compositional tool, I try to balance the top part of the image with the bottom part and arrange the symmetry into a composition that will lead the eye through the image. As I have discussed above, this could be from left to right or diagonal lines pulling the eyes into the centre of the photo, as I have shown in Figure 12.

Figure 12 Symmetry
This image shows how the diagonal reflection will draw your eye from the corner of the image into the centre. My 25mm lens captured this photograph.
When I look at Figure 12, my eyes see a balance between the top and bottom and the left to right. My eyes notice the mountains on each side of the photograph and their reflections. The convergence of the mountains in the centre of the image pulls my eyes into the centre. Next, they notice the difference between smooth water in the bottom part of the photo and finer detail of the mountains and sky at the top. This photo is well-balanced, and everywhere I look, my eyes focus on the centre of the photograph.
Symmetry is an excellent compositional tool to use, and it works well when there is calm water in the image. A reflection is not the only way to compose the symmetry composition. It is possible to align shapes in the landscape to mirror each other. Symmetry works well with wide-angle and telephoto lenses.
RULE OF THIRDs
When I am composing my photos, I often use the rule of thirds. I use the rule of thirds to guide me with the placement of objects in my images. This rule intends to divide an image into three equal parts. The intent is for the photographer to place objects in each third. The horizon is placed on one line in the middle, as shown in Figure 13. Generally, two-thirds of the image will be either foreground or sky. Whilst the name of this compositional tool suggests it is a “rule”, this is not always ideal. I use it as a guide, and I always make my final decision based on what is best for the image and not the rule. It is said, “rules are there to be broken”.

Figure 13 Rule of Thirds
This image shows how the rule of thirds for the composition of objects in a photograph. My 35mm lens was used to capture this photo.
FINE-TUNING
In the sections above, I have explained each type of compositional tool that I work with and their differences. When I compose my photos, I consider what is in the image and what is left out. I often find myself removing or excluding detail from a photograph to make it stronger. The removal of objects that do not add value to the final photo will produce a stronger one. It is essential to evaluate your images out in the field. You should review what objects and details are in your photographs and what is not. Sometimes, the removal of objects from your photos is more important than what is on them. When I am composing my photos, I often think to myself less is more.
Throughout this tutorial, I have explained what I consider the best approach to composition in landscape photography. My experiences have shown me that the best compositional tool is the one that guides the eye through the scene.
Hopefully, you now have a better understanding of composition. During sunrise and sunset shoots, the light changes dramatically and quickly, and the time during these periods is short. With this in mind, it’s essential to plan your shots, and this will put you in the best possible position to creating a successful image in the best possible light.
I hope you have enjoyed reading this blog, and I hope you have learnt something new.