New Zealand Landscape Photographer Talks Understanding Light
A New Zealand landscape photographer tutorial
New Zealand landscape photographer Stephen Milner talks understanding light for landscape photography. This blog is part of his HOW TO TAKE LANDSCAPE PHOTOS - TEN STEPS TO CREATING SUCCESSFUL LANDSCAPE IMAGES tutorial series.
For a list of landscape photography equipment that I use, please check out My Gear List.
In this tutorial, I share my understanding of light when shooting landscape photos.
When I plan landscape photography trips to take landscape photos, the two aspects I consider the most are light and composition. There is a trip planning process that I go through that investigates potential subjects to understand when will be the best time to visit a location. I have separate tutorials on composition and trip planning, and for this tutorial, I will be focusing on the subject of light.
The quality of light is one of the most important aspects of photography, and it is essential for landscape photography. Over the last few years, I have spent a lot of time just observing how light behaves throughout the day, wherever I am and whatever the weather conditions, and without my camera in my hand. It was a worthwhile process for me, and it was something that I did daily. Without my camera in my hand, I would watch the light throughout the day and see how it affects the surrounding landscape in every direction. I learnt to visualise how the light will be in a given area at any time of day, in different weather conditions and any bearing.
HOW LIGHT BEHAVES THROUGHOUT THE DAY
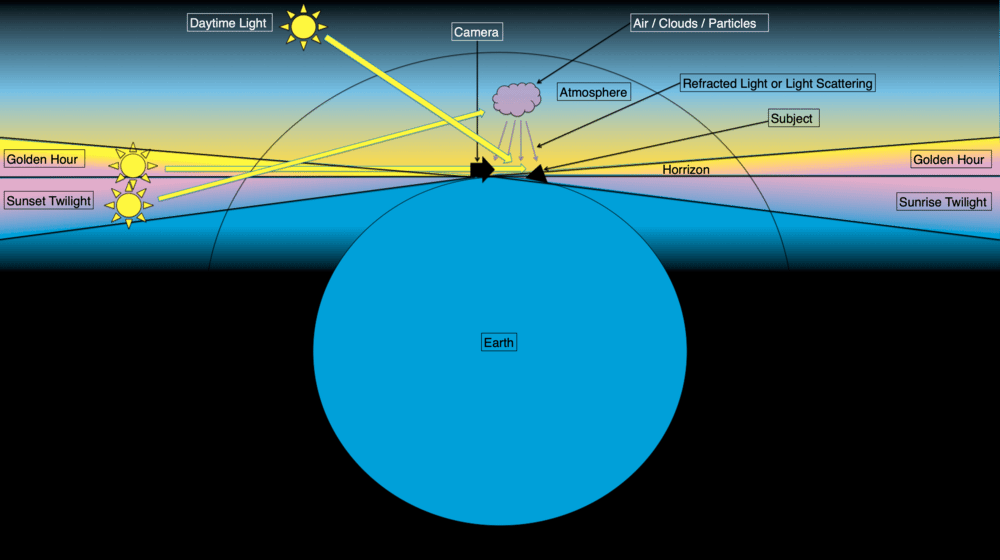
In this blog, I will describe how light behaves throughout the day and how it will impact your images. Using my photos and Figure 1, I explain the different types of light for landscape photography.

Figure 1. How Light Behaves throughout the Day.
This illustration gives a high-level overview of how light will behave throughout the day. It should be used as a reference point as you read the below text.
In the text below, I describe my considerations for light when I plan my landscape photography trips. These key considerations will cover the lighting conditions throughout the day and the settings for your camera. Please read each section carefully and refer to the supporting images.

Figure 2. Colour Temperature in Kelvin
Use this image as a guide to white balance settings for your camera.
White Balance
When setting up your camera during a landscape photography shoot, you must consider how the light is behaving at that time in the location of your subject. Consider this as colour temperature as per Figure 2. The white balance settings of your camera should match the colour temperature of your subject. You can do this manually in your camera as per the instruction manual to your camera, or you can let your camera decide for you by leaving the white balance in auto mode. It is possible to change the white balance of your photos during post-processing.
Colour Temperature
At any one given point throughout the day, light enters the atmosphere and over 24hr's it changes. For most of a 24hr period, the light sits between two ranges. The first range is night light, and this is <2,000k. Assuming your camera white balance setting is 2,000k (or as close as possible), photographs taken at night will often have a cold look to them, as per Figure 3. The moon and stars will generally be close to white (5,400K), and that is because they are emitting light (stars) or reflecting light from the sun (the moon). Any light pollution that enters the image from around the camera will generally be tungsten, will appear warmer in colour. Remove unwanted tungsten light during post-processing with a colour target brush tool and its white balance.

Figure 3. Astrophotography
Astrophotography is difficult because of the lighting conditions and the amount of exposure required to make a photo. The focal length of your lens will affect how much shutter time you must use for the stars to be sharp. Wide-angle lenses with a large aperture are best for astrophotography and are more forgiving with exposure time. The variable in astrophotography is the ISO setting.
The second range is daytime light. Depending on the weather, it sits between 5,400k to 7,000k. Photography during the day can be a challenge because of the severity of light. When you take a photo of a subject in direct sunlight, any colour will often appear white when and there will be a loss of detail. You can reduce your exposure time to compensate for this, but this will darken the overall photo, including the shadow areas. When you change the exposure setting up or down from the light meter reading, this is known as exposure compensation. If you decrease the exposure setting, you will have to recover the shadow areas and remove noise during post-processing. It is possible to achieve soft light during the day, but this requires something to defuse light, for example, fog or clouds.

Figure 4. Daytime Black and White Photo
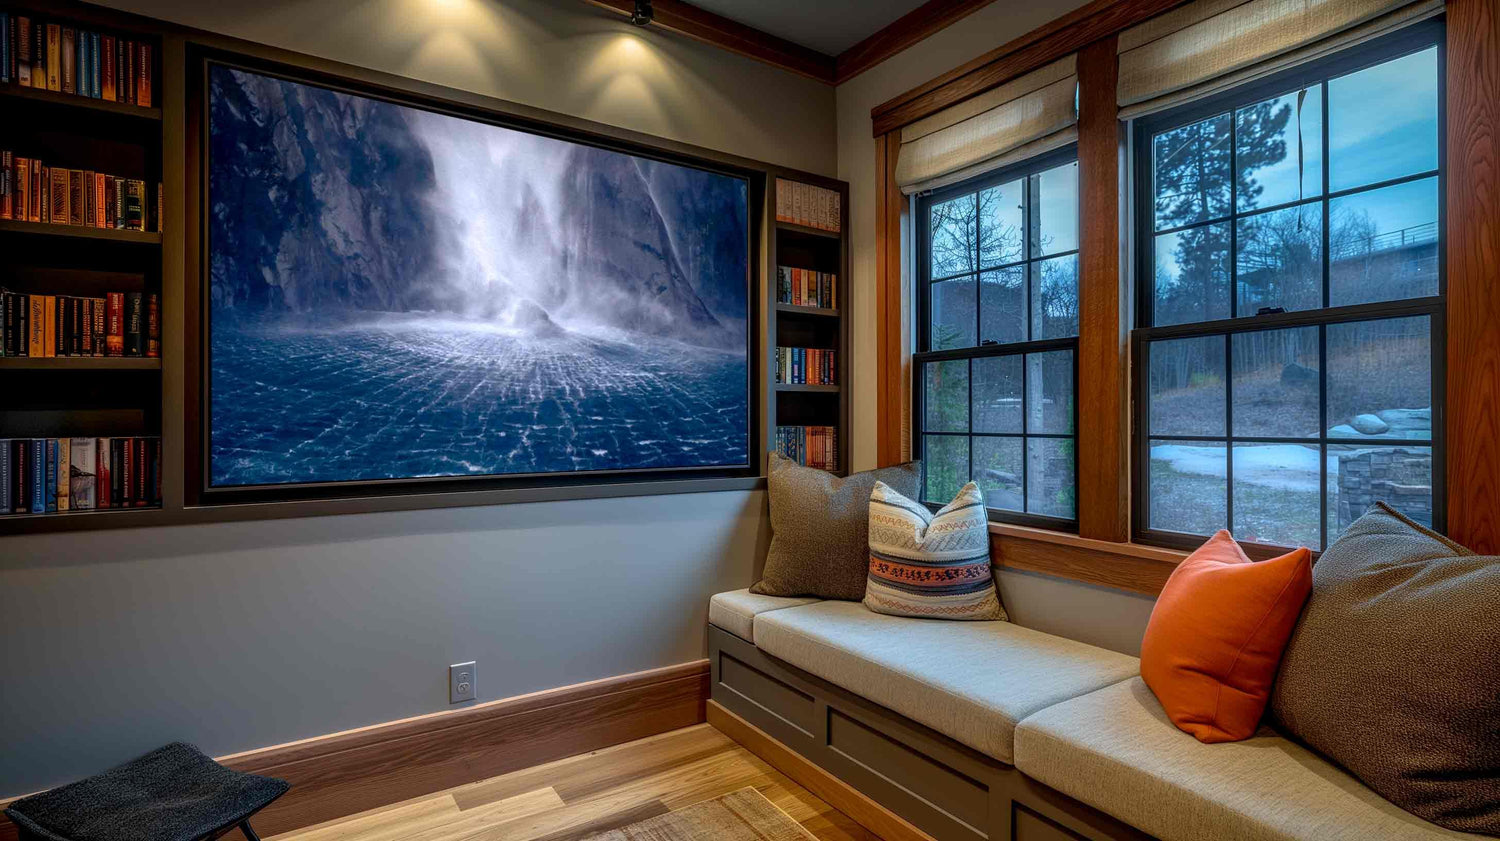
I like this photo because the shadow areas frame the waterfall, and the path leads your eye through the trees. It has a sense of mystery and that the waterfall is hidden.
In the past, I have tried to compensate for challenging lighting conditions during the day by reducing my exposure (exposing to the left) or exposure bracketing and creating high dynamic range (HDR) photos during post-processing, which requires a lot of time in post-processing. My daytime HDR photographs have never been that great, but I had some success with these by exposure bracketing during sunrise and sunset and then blending them during post-processing.
I do not enjoy sitting in front of my computer for extended periods editing photos. I prefer to spend my time out in the field exploring new subjects, planning trips and taking photographs. Plus, it is fair to say that you cannot make great photos during editing when they do not have great foundations (a subject of interest, good light and a strong composition). However, it is possible to take great black and white landscape photos during the day as per Figure 4.
So, now that we have established that most of the day is not that great for taking landscape photos, we need to consider when is the best time. In my experience, the best time to take landscape photos is during sunrise or sunset, plus one hour on either side of sunrise or sunset, and during the day when there is clouds or fog that diffuses the light.
Sunset and sunrise
Quite often, I have wondered why I spend lots of money on gear and spend lots of time planning and going on trips, for something that happens very early in the morning and late in the evening, and that totals two to three hours in one day (depending on the time of year and location). At some point, we have to ask ourselves why. For me, it comes down to the adventures, quality of light and witnessing the landscape at a time that most people do not see.
So, now we have established that the best time to take landscape photos is at sunrise and sunset. We spend lots of money and time on equipment and planning (and going on) trips for something that happens in a short period and in very unsociable times. We need to consider what all the fuss is.
The light during sunset and sunrise is softer (<3,000k) than daytime light, which is easier for your camera to manage because the contrast or dynamic range in a scene will be less. Plus, the resulting soft light in photos is, in most cases, more pleasing to the viewer.
During sunrise and sunset, there are two different types of light. Each of them will affect your images differently. They are Twilight (also referred to as Dusk or Dawn) and the Golden Hour. The first, or last depending on whether it's sunrise or sunset, is Twilight, and then there is the Golden Hour as per Figure 1 above.

Figure 5. Blue Hour Photo
This photo is from the Blue Hour. I like its cold colour temperature and minimal design. It focuses on composition, and the difference in tones emphasises a strong relationship between the foreground rocks and the mountains in the distance.
Twilight
During the twilight, the light rays from the sun are starting to enter (or leave at sunset) the atmosphere above your camera and subject, and there will be no direct light. The light during the twilight is scattered down from the clouds and particles in the air, as you can see in Figure 1. This type of light is the softest light possible, and the dynamic range is easy for your camera to handle and often produces very pleasing images.
During the twilight, there are two stages. One is the blue hour (Figure 5), and the other is the pink hour (Figure 6). To complicate things even more, both the Blue Hour and the Pink Hour last approximately one hour between them (20 - 30 min each).
During the blue hour, the scene will typically be very cool in colour. But, the temperature will be at 8000k. Contrastingly, during the pink hour, the colours will be warm, and the colour temperature will be at 5000k or less.

Figure 6. The Belt of Venus
This photo is from the Pink Hour, and it has a nice warm colour to it. I like how the shapes in the sand pull you into the photograph. They lead you to the sea and then to the mountains in the distance. You can see the Belt of Venus in the sky.
During the pink hour, it is possible to photograph the belt of Venus when there are not many clouds. The belt of Venus is the transition point from the Pink Hour to the Blue Hour. It is the sun's light travelling up into the atmosphere when it has fully set. The particles in the atmosphere catch the last of the sun's light and scatter it down on the scene as per Figures 1 to 6. The belt of Venus has a curve to it, which is the round shape of the Earth.
Twilight light is my favourite type of light. It is soft, produces nice colour and it has low contrast details.
Golden Hour
After twilight (or before sunset) follows the golden hour. The sun will rise above the horizon during sunrise or lower during a setting sun. The light hitting your subject at this point is the softest direct light possible, and it will illuminate your photograph with a golden colour, as per Figure 7. The light during this period is pleasing.
The reason why sunrise and sunset light during the golden hour is soft compared to the light during the day is that the light rays from the sun travel further through the atmosphere to reach your subject, as per Figure 1. As the sun approaches the horizon, light rays are travelling horizontally through the atmosphere. The light rays will travel extra distance, which is the distance between you and your camera before the light hits your subject. This extra distance and the extra particles in the air soften the light.

Figure 7. Golden Hour Photo
This photograph is from sunset, and the sun is setting to my left. The last of the light is illuminating my subject with golden colours.
The elevation and distance of your subject relative to the position of your camera are essential to consider. The highest point of mountains on the horizon opposite the sunrise or sunset will be illuminated by the first (or last light). The same logic applies to high-level clouds, and when the soft light hits the high-level clouds, they often scatter softer light down, which produces a very soft light and sometimes pink hue as per Figure 8.

Figure 8. First Light on the Mountain Tops
I remember waiting for the sun to start to rise, and as I turned around, I noticed the sky behind me where the sun was rising was on fire. This day, I planned to photograph these mountains with direct sunrise light. I held my nerve, and I didn’t reposition my camera.
light metering
When you set up your camera, you should understand how your camera meters for light. Most modern digital cameras have three or four different light meter settings. In my experience, there are two that I use the most for landscape photography, one is spot, and the other is averaging. The spot meter will read light from a set point on the camera's sensor. The average meter will read light across the whole sensor.
I would typically use the spot meter in low to medium contrast scenes and the average meter in high contrast scenes. You must meter for the light that has the most presence, which is the mid-tones.
Contrast / dynamic range / Luminosity
In photography, the term contrast refers to the difference between the highlights and the shadows. Contrast is the same as dynamic range and luminosity. There can be varying degrees of contrast in landscape photography, which is dependable on the time of day and where your camera is pointing relative to the sun. The contrast in landscape photography can occur in three ways. Low contrast landscapes have front lighting, medium contrast landscapes have side lighting, and high contrast landscapes have backlighting. Ansel Adams developed a zone system that measures contrast from pure black to pure white, with nine shades in between. For more information on this subjects, please read my camera skills tutorial blog.
Front lighting
When you photograph a landscape in front lighting conditions, it will have low contrast, as per Figure 9. Front lighting is when your camera is pointing away from the sun. Because of the low contrast, your camera will manage these lighting conditions the easiest. The difference in the luminosity values across the scene will not be significant. Photos taken with front lighting during sunrise and sunset are pleasing to the eyes.

Figure 9. Front Lighting
This photograph is one of my favourites because of its simplistic design and composition of objects and tones. It is an example of front lighting. As the sun rises behind me, there are beautiful soft colours in the sky. They are scattered down onto the snow in front of me by the particles in the air.
When you photograph a landscape with low contrast, it is possible to increase your exposure to capture as much detail as possible in the shadows. When you increase your exposure, you are adding exposure compensation. When you add exposure compensation, you will move your camera's histogram to the right.
Side lighting
When a landscape has medium contrast, the difference between highlights and shadows are more visible, as shown in Figures 10 and 11. Side lighting is when you are approximately ninety degrees to the sun, and the light is hitting the landscape from the side. Side lighting will produce an image with pleasing contrast, and the shadows will increase depth in the photograph. During sunrise and sunset, shadows will be very long because of the low-level light coming across the scene. The light will be brighter to the side of the image that is closest to the sun.

Figure 10. High Dynamic Range Sunrise Photo
This photo shows an example of side lighting. The direction of the sun is to the right and slightly behind the church. It was a challenging shoot because of this. With this image, I set my exposure setting from a meter reading off the sky because I didn’t want to lose any details in the sky. My camera is capable of capturing details in shadow areas. During editing, I lifted the shadows and slightly reduced the contrast.
Most modern digital cameras will manage these scenes well, and you will not need to use any exposure bracketing or HDR techniques. In this situation, you should expose as far right as possible to capture as much detail in the shadows as possible. However, careful consideration should be given to your highlights to ensure you don't blow them out and overexpose these areas and lose detail.

Figure 11. Side Lighting
This sunrise photo is an example of side lighting. To get this photo, I camped overnight on the side of a mountain at 2500m of elevation. As the sun rose from the east, it illuminated the sky and the side of the volcano beautifully.
Backlighting
High contrast landscapes are where the difference between highlights and shadows are high, as shown in Figure 12. High contrast occurs when you are shooting directly towards the sun. Most modern-day cameras are not capable of capturing images that reflect how our eyes see these scenes. The only way to capture a scene like the one in Figure 12 is to take multiple photographs at exposure times that suit the highlights, the shadows, and the mid-tones. Once you have these photographs, you blend them in post-processing using HDR software or using luminosity masking.

Figure 12. High Dynamic Range Sunset Photo
This photo was challenging because of the high dynamic range light conditions that my camera did not handle. I used the bracketing feature in my camera to take five different images at 1/3 stop increments, and then I blended them using luminosity masking techniques in Photoshop.
HISTOGRAMS
Most digital cameras and editing software will have a histogram feature. The histogram will preview the dynamic range and luminosity values of your landscape photographs. For reference, luminosity is a term used to describe the brightness of both light and colour. Most digital cameras have a feature that will allow you to view a histogram. The histogram in your camera should display on your LCD screen during the live preview and in its playback mode. When you are setting up the exposure settings in your camera, you should refer to its histogram. Take care, not too overexposed the highlights.

Figure 13. Low Contrast Histogram
This histogram represents a low contrast scene, and it is what you should target when you are photographing your landscape photos.
When you create landscape photos, it is essential to understand that the histogram in your camera represents the detail in a scene with exposure settings in play that affect light and colour. These are aperture, shutter time, ISO and the metering setting.

Figure 14. High Contrast Histogram
This histogram represents a high contrast scene, and it is what you should avoid when you are photographing your landscape photos unless you are creating a high dynamic (HDR) style photo.
At this point, you must note that cameras can not replicate what we can see through our eyes. Our eyes are significantly more advanced than cameras are at managing high dynamic range situations. Even though we may look at a high dynamic landscape with our eyes and enjoy it, photos from the same landscape with a camera will not be so enjoyable without significant editing.
When you are photographing your landscape photos, and you are adjusting the settings on your camera. Look closely at your histogram because it is an excellent tool for guiding you. The histogram will guide you with your exposure settings. The left-hand side of the histogram represents the shadows, the right-hand side represents the highlights, and the middle represents the mid-tones. The height of the histogram represents pixels. It is essential to keep the curve away from the edges of the histogram (this is not the case when taking multiple images for HDR editing).

Figure 15. Blown Highlights Histogram
This histogram represents an image with blown highlights and potential loss of detail in those areas. This situation should be avoided when you are photographing your landscape photos.
The histogram can also help you understand the dynamic range of a landscape. Figure 13 represents a low contrast scene with lots of detail in the mid-tones. As you adjust your camera setting, the histogram will move to the left or right. Figure 14 represents a high contrast landscape with lots of detail in the shadow and highlight areas and a loss of detail in the mid-tones. Figure 15 shows a landscape that will be overexposed, and there will be a potential loss of detail. If this histogram was at the far left, it could be the same for the shadows.
location
When you plan your landscape photography trips, it is essential to consider the location of your subjects and the time of year. Light behaves differently in different locations around the world and at different times of the year.
For example, during winter, the days are shorter than in the summer, which means you don’t have to wake up so early or stay out late. The light is softer because the sun is further away from the Earth. The light has to travel through more of the earth atmosphere, which produces soft hue colours. The closer your subjects are to the Earth’s equator (or further away) will affect the amount of time for sunrise and sunset light you get. At higher altitudes, the light will last longer.
the best time to take landscape photos
In this tutorial, I have explained how light behaves during the day and how it will affect your landscape photos based on my experiences. My experiences have shown me that the best time to take landscape photos is during sunrise and sunset. During sunrise and sunset, the light is softer and produces more pleasing images.
During sunrise and sunset shoots, the light changes dramatically and quickly, and the time during these periods is short. With this in mind, it’s essential to plan your shots, and this will put you in the best possible position to creating a successful image in the best possible light.
I hope you have enjoyed reading this blog, and I hope you have learnt something new.